If you care about your kids, your pets, and the planet all at once, store-bought cleaning wipes can feel like a compromise you are tired of making.
On one hand, you want a home that looks and feels clean, especially with little hands touching every surface, dropping snacks, and dragging toys everywhere.
On the other hand, you do not want harsh fumes, mystery chemicals, and an overflowing trash bin full of single-use wipes and plastic packaging.
Homemade natural cleaning wipes offer a calmer middle ground, giving you reusable wipes DIY style, built with a non toxic cleaner solution that you actually understand.
In this article, you will learn how to choose ingredients, fabrics, dilution ratios, storage methods, and safe use habits so your homemade natural cleaning wipes fit your real life as an eco-minded parent.
The everyday dilemma of the eco-conscious parent
Modern parenting comes with constant messes and constant marketing, and it is easy to feel stuck between convenience and conscience.
You see disposable wipes everywhere, promising quick cleaning and germ-fighting power, yet leaving you uneasy about both the ingredients and the waste.
You want products that match your values, but you also want routines that are realistic when your day is already full of school runs, meals, work, and bedtime battles.
Homemade natural cleaning wipes are not about perfection or living in a chemical-free fantasy, but about taking back a bit of control and finding a better balance.
What homemade natural cleaning wipes actually are
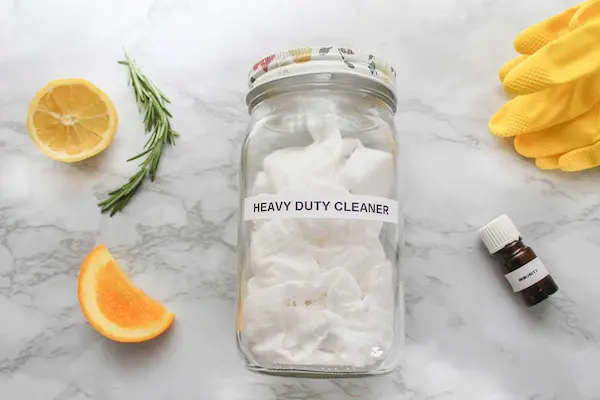
Homemade natural cleaning wipes are reusable cloths soaked in a simple, carefully chosen non toxic cleaner solution, stored in a container so they are always ready to grab and use.
Instead of throwing away a wipe after every spill, you wash the cloths, refill the container, and keep the cycle going with far less waste.
- The cloth provides the scrubbing and wiping power.
- The solution provides the dissolving, lifting, and freshening action.
- Your choices provide the safety, comfort, and peace of mind.
These wipes are best for everyday cleaning and freshening, not for heavy-duty medical disinfection, and that clear expectation is part of using them responsibly.
Benefits of Homemade Natural Cleaning Wipes
Health, air quality, and fewer harsh fumes
Many ready-made wipes rely on strong fragrances and aggressive solvents that can bother sensitive skin, lungs, and eyes, especially in babies and young children.
By making your own homemade natural cleaning wipes, you can:
- Skip artificial fragrances completely or keep scents very light.
- Avoid ingredients that have triggered reactions in your family before.
- Choose gentle soaps and lower-intensity cleaning agents for daily use.
- Improve ventilation and air quality by reducing harsh chemical use indoors.
You may still use stronger products when they are really needed, but they no longer define every single cleaning moment in your home.
Waste reduction and budget-friendly cleaning
Single-use wipes generate repeated plastic waste, packaging waste, and ongoing costs that quietly drain your budget and fill your trash can.
Reusable wipes DIY projects reduce this in several ways.
- Old T-shirts, baby blankets, and towels are upcycled into useful cloths.
- Cloths can be washed and reused dozens or even hundreds of times.
- Simple ingredients like water, mild soap, and vinegar are inexpensive.
- You buy less plastic packaging and fewer disposable cleaning products.
Over time, the combination of reusing fabrics and mixing your own non toxic cleaner solutions can make a visible difference in both your trash output and your monthly spending.
Emotional peace of mind and values alignment
Using homemade natural cleaning wipes is not just a practical choice; it is also emotional.
Every time you reach for a reusable cloth instead of a disposable wipe, you feel a small sense of alignment between your actions and your values.
That feeling matters, especially when parenting already comes with so many compromises you cannot easily control.
Ingredients for a Non Toxic Cleaner Base
Core ingredients that make sense for families
A safe, practical non toxic cleaner for homemade wipes starts with simple, familiar ingredients that have clear roles.
- Water:
The main base of your solution, ideally distilled or previously boiled and cooled to help reduce microbial growth over time. - Unscented liquid castile soap:
A plant-based soap that helps lift grease, food residue, and everyday dirt without heavy synthetic additives. - Mild dish soap:
Useful for degreasing kitchen surfaces when used in low amounts and rinsed or wiped with plain water afterward if needed. - White distilled vinegar:
Helpful for cutting light grease and some mineral buildup on many surfaces, but not appropriate for natural stone. - Optional alcohol or hydrogen peroxide:
Can offer stronger cleaning action or light disinfection when used correctly, although they must be treated with respect and stored safely.
Keeping recipes simple and clear makes it easier to track what works for your family and to adjust if sensitivities or surface issues appear.
Ingredients to use gently and sparingly
Some ingredients can be part of homemade natural cleaning wipes, but they work best with moderation and awareness.
- Essential oils:
These highly concentrated plant extracts can add scent and mild cleaning benefits but may irritate skin, lungs, or pets if overused. - Stronger acids:
Concentrated acidic ingredients can damage certain finishes and are rarely necessary for everyday kid-friendly cleaning wipes. - High concentrations of alcohol:
Strong alcohol solutions can be drying to skin, flammable, and overpowering in poorly ventilated areas.
When in doubt, start with very small amounts, use these ingredients only in specific recipes, and keep a fragrance-free batch available for the most sensitive situations.
Ingredients best kept out of kids’ wipes
For wipes used where children eat, play, or sleep, it makes sense to avoid certain ingredients altogether.
- Chlorine bleach in everyday wipes for toys, trays, or small hands.
- Ammonia or strong solvent-based cleaners that give off heavy fumes.
- Complex mixtures found in some industrial or automotive cleaners.
Those stronger substances can have a place in specific, occasional tasks, but they are not needed in your everyday reusable wipes DIY setup.
Choosing Fabrics for Reusable Wipes DIY
Fabric options that work well as wipes
The right fabric turns a simple cleaning solution into an effective homemade natural cleaning wipe that feels good in your hand and works well on surfaces.
- Old cotton T-shirts:
Soft, absorbent, and easy to cut into squares, perfect for general cleaning. - Cotton flannel or receiving blankets:
Gentle and slightly fuzzy, ideal for dusting and wiping kid zones. - Worn bath towels and washcloths:
Great for bathroom and kitchen messes where more texture helps. - Birdseye or waffle-weave cotton:
Thin yet absorbent cloth that dries quickly and reduces odors. - Microfiber cloths:
Very effective for dust and grease, though some parents limit them due to microplastic concerns during washing.
Sizes, cuts, and simple organization
Choosing the right size and using color-coding can make your reusable wipes DIY routine more practical and hygienic.
- Cut squares roughly 15 to 20 centimeters, or 6 to 8 inches, for a comfortable hand fit and good surface coverage.
- Use pinking shears or sew simple hems if you want to reduce fraying, although many parents happily use raw edges for cleaning cloths.
- Assign one color or pattern for kitchen surfaces, another for bathroom use, and a third for general dusting and kids’ spaces.
- Keep a small set of extra-absorbent cloths reserved for big spills and floor messes.
This simple system helps you avoid cross-contamination and makes it easier for other family members to help without confusion.
Step-by-Step: How to Make Homemade Natural Cleaning Wipes
Gentle everyday wipes for kid zones
This non toxic cleaner recipe is designed for high chairs, tables, and general surfaces where children spend a lot of time.
- Measure 2 cups of warm water into a mixing jug.
- Add 1 tablespoon of unscented liquid castile soap.
- Stir slowly until the soap is fully mixed without creating huge bubbles.
- Optional: add 5 to 8 drops of a very mild essential oil, or none if your family is sensitive to scents.
- Pour the solution evenly over your folded cloths in a jar or container with a tight lid.
These wipes focus on safe daily cleaning and wiping away food residue, fingerprints, and light dirt, rather than on disinfection.
Kitchen degreasing wipes for cooking areas
For greasy cabinet doors, light stove splatters, and sticky handles, a slightly stronger soap-based recipe can help.
- Combine 2 cups of warm water in a jug.
- Add 2 tablespoons of mild dish soap.
- Stir gently to dissolve the soap completely.
- Optional: add 5 drops of lemon or orange essential oil if your household tolerates citrus scents.
- Soak sturdy cotton or terry cloth wipes in the solution, then store in a separate labeled container.
Because this solution is stronger, you may want to follow with a damp plain water cloth on food-prep surfaces to remove any leftover soap film.
Targeted bathroom wipes for sinks and counters
Bathroom surfaces deal with toothpaste, soap scum, and water marks, so a vinegar-based formula can be useful for certain materials.
- Pour 1 cup of white distilled vinegar into a jug.
- Add 1 cup of water to dilute the vinegar.
- Mix in 1 tablespoon of castile soap or mild dish soap.
- Stir to combine, avoiding heavy foam.
- Use on ceramic sinks, many tiles, and some counters, but avoid natural stone surfaces.
Label this batch clearly so you remember it includes vinegar and is not meant for marble, granite, or other sensitive stone.
Assembly steps for every batch
No matter which recipe you use, the assembly process is similar.
- Wash all cloths in hot water before first use to remove lint and residues.
- Fold cloths and stack them neatly in a clean container with a lid.
- Prepare your chosen solution and pour it slowly over the cloths.
- Press down to help the liquid spread evenly through the stack.
- Add a little more solution if the top cloths feel dry, but avoid a pool of liquid at the bottom.
- Label the container with the recipe name, main ingredients, and the date.
- Store the container safely where kids and pets cannot access it easily.
Dilution Ratios and Practical Examples
Mild daily cleaning ratio
For a gentle everyday non toxic cleaner, a simple ratio that works well is:
- 2 cups of water
- 1 tablespoon of castile soap
This combination keeps the solution mild enough for frequent use while providing enough cleaning power for typical family messes.
Grease and sticky mess ratio
When tackling cooking-related messes around the stove or counters, a slightly stronger soap ratio can be effective.
- 2 cups of water
- 2 tablespoons of mild dish soap
You can always follow with a plain water wipe if you want to ensure no soap residue remains on surfaces where food is prepared or served.
When you need stronger action
In some cases, you may want a more intensive solution for specific tasks, while still being mindful of safety.
- Use a separate spray bottle of hydrogen peroxide or alcohol-based cleaner for special disinfection needs.
- Spray on surfaces and allow proper contact time before wiping with a clean reusable cloth.
- Keep these stronger products clearly labeled and stored away from children.
Instead of turning every wipe into a strong disinfectant, you can reserve that level of intensity for when it truly matters.
Storage, Labeling, and Shelf Life
Best storage containers and locations
Good storage helps keep your homemade natural cleaning wipes fresher and safer.
- Use glass jars, sturdy plastic containers, or repurposed wipe boxes with secure lids.
- Choose wide openings so you can easily grab one cloth at a time.
- Keep containers in cool, dry places away from direct sunlight and strong heat.
- Place them on high shelves or in cabinets that small children cannot reach.
Labeling to avoid confusion
Clear labels reduce guesswork and prevent accidental misuse.
- Write the name of the recipe on each container, such as “Gentle Daily Wipes” or “Kitchen Degreaser Wipes”.
- List the main ingredients, especially if vinegar, alcohol, or strong soap is included.
- Note the preparation date so you can track how long the batch has been stored.
How long homemade wipes should last
Because these wipes are made with simple ingredients and usually no preservatives, it is best to treat them as short-lived cleaning helpers.
- Gentle water-and-soap wipes: aim to use within 1 to 2 weeks.
- Vinegar-based wipes: preferably used within 2 to 3 weeks.
- Stronger or more complex solutions: better prepared in smaller, more frequent batches.
If you notice unusual smells, discoloration, or visible growth, discard the solution, wash the cloths thoroughly, clean the container, and start a fresh batch.
Where to Use Homemade Natural Cleaning Wipes
Surfaces that usually work well
Many everyday surfaces handle homemade natural cleaning wipes beautifully when recipes are chosen with care.
- High chair trays and table tops used for snacks and crafts.
- Kitchen counters made of laminate or other non-stone materials.
- Refrigerator shelves, drawers, and door handles.
- Bathroom sinks, faucets, and tiles.
- Door handles, light switches, and banisters.
- Plastic and silicone toys that can handle gentle moisture.
- Window sills, baseboards, and other dusty surfaces.
Surfaces that need extra caution
Some materials can be damaged by acidic solutions, heavy moisture, or strong soaps.
- Natural stone such as marble, granite, and limestone, which do not pair well with vinegar.
- Unsealed or lightly sealed wood floors and furniture that swell with excess water.
- Specialty finishes on appliances and furniture that may streak or dull easily.
- Delicate screens and electronics that require manufacturer-approved cleaners.
When you are unsure, test your non toxic cleaner on a small, hidden patch first and wait for it to dry before making it part of your routine.
When a regulated disinfectant is a better choice
Homemade natural cleaning wipes are wonderful for routine cleaning, but there are times when you may prefer a product that has been lab-tested and regulated for disinfection.
- After handling raw meat or raw eggs on kitchen surfaces.
- During illness, especially with vulnerable family members in the home.
- For cleaning up bodily fluids like vomit or blood.
- In situations where official guidelines specify particular disinfectants.
You can use homemade wipes for most daily tasks and keep a regulated disinfectant on hand for these higher-risk scenarios, combining practicality with safety.
Safety Guide for Kids, Pets, and Sensitive People
Household rules for safe use
Even when your solution is designed as a non toxic cleaner, basic safety rules still apply.
- Store all cleaning solutions and wipe containers out of reach and out of sight of children.
- Explain to older kids that wipes are not toys or towels for faces and eyes.
- Allow surfaces to dry before babies or toddlers crawl, chew, or handle them.
- Keep essential oils and concentrated ingredients locked away or very high up.
- Make sure pets cannot access open containers or lick freshly wiped wet surfaces.
Adapting recipes for extra-sensitive families
Some households include individuals with asthma, allergies, eczema, or sensory sensitivities, and they may need an even gentler approach.
- Use only water and a very small amount of unscented mild soap for most wipes.
- Avoid essential oils completely or test very cautiously in tiny