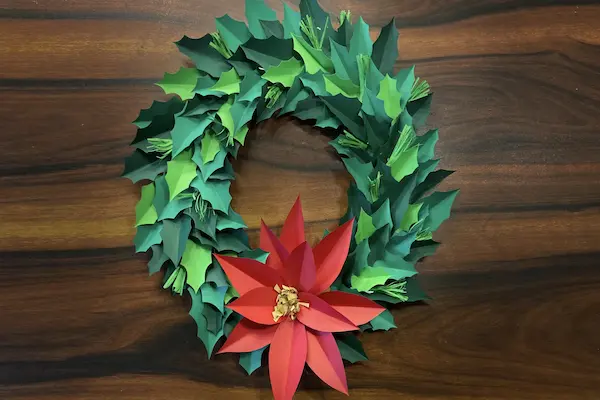
Creating a DIY holiday wreath with paper is one of those joyful seasonal activities that lights up a home instantly, because the process blends creativity, color, family bonding and budget friendly crafting in a way that feels warm, inclusive and wonderfully festive for children and adults alike, especially when everyone gathers around the table ready to fold, glue, decorate and admire a handmade decoration that will brighten any door, wall or mantel.
Family crafters looking for seasonal decor that is simple, tidy, kid friendly and gentle on the wallet often fall in love with paper wreath diy projects, because the materials are easy to handle, the steps are safe to follow, the templates are straightforward and the results have an unexpectedly charming and polished look that resembles expensive store bought decor despite being made from basic crafting supplies already available at home.
This comprehensive guide will walk you through every detail needed to create your own diy holiday wreath with paper, offering printable style templates you can copy by hand, a full material list, step by step folding and gluing instructions, color palette ideas for multiple holidays, creative variations to try with kids and helpful storage tips to protect your seasonal decor for years, ensuring that your handmade wreath becomes a beloved part of your holiday traditions.
Why a DIY Holiday Wreath With Paper Is Perfect for Seasonal Decor
Families searching for holiday crafts that feel festive without requiring expensive materials, sharp tools or complicated techniques often gravitate toward a diy holiday wreath with paper, because the project is easy to personalize, wonderfully accessible and adaptable to every season of the year, whether you’re celebrating winter holidays, spring blooms, autumn harvests or summertime parties.
Paper wreath diy projects also create opportunities for kids to participate safely, since the tasks involve cutting simple shapes, folding colorful sheets, applying school glue and arranging pieces in creative patterns, which makes this an excellent craft for family nights, classroom activities, church gatherings or neighborhood decorating days.
Because paper comes in endless textures and colors—from construction paper and cardstock to metallic sheets, patterned prints and recycled scraps—the design possibilities multiply quickly and help each family express its own personality through shapes, palettes and decorative details.
Unlike heavy store bought wreaths, a diy holiday wreath with paper stays incredibly lightweight, making it ideal for hanging with removable tape, loops of string or soft adhesives that will not damage walls or doors, especially helpful for families in apartments, dorms or rental homes.
Materials You Need for This Paper Wreath DIY
Gathering materials before beginning helps the project flow smoothly and prevents interruptions, especially when crafting with excited children who want to keep creating without waiting for missing supplies.
Basic Materials for Your DIY Holiday Wreath With Paper
- Assorted colored cardstock or construction paper in holiday themed tones.
- Scissors suitable for kids or adults depending on who is crafting.
- School glue, a glue stick or low temperature hot glue gun (adult use only).
- A round base made from cardboard, foam board or thick cardstock.
- Pencil, ruler and eraser for marking templates.
- Optional hole punch for making small decorative accents.
Families often find that using cardstock for leaf or petal shapes creates a wreath that feels sturdier and lasts longer, while construction paper adds softness and allows younger children to participate comfortably.
Optional Decorative Extras
- Glitter paper or metallic paper for sparkling accents.
- Ribbon or twine for hanging your wreath.
- Buttons, pom poms or foam shapes for center ornaments.
- Markers or crayons for adding details or textures.
- Artificial berries, tiny bows or felt shapes for seasonal themes.
Adding small decorative pieces turns a basic diy holiday wreath with paper into a fully customized piece of seasonal decor that reflects your family’s unique style.
Printable Style Templates for Your Paper Wreath DIY
Because many families do not have access to printers or prefer hands on crafting, the templates provided here can be traced directly from your screen or sketched by hand using simple geometric shapes, making the process accessible even for young crafters.
Template 1: Classic Leaf Shape
This classic leaf template suits winter, autumn or general festive wreaths.
- Draw a long oval about 3 to 4 inches tall.
- Add a slight point at the top.
- Include a gentle curve on one side for variation.
Template 2: Rounded Petal Shape
Rounded petals make floral wreaths perfect for spring holidays and cheerful celebrations.
- Sketch a tear drop shape about 2 inches tall.
- Keep the bottom rounded rather than sharply pointed.
- Curve both sides evenly for symmetry.
Template 3: Wide Holly Leaf
Families crafting winter holiday decor often choose holly shapes for their festive look.
- Start with an elongated oval.
- Add small triangular notches along both sides.
- Taper the ends slightly for a traditional holly shape.
Template 4: Layered Star Shape
A layered star element adds brightness to holiday wreaths and creates a striking focal point.
- Draw a simple five point star.
- Create a slightly smaller version to layer on top.
- Cut multiple sizes for extra dimension.
How to Prepare the Base for Your DIY Holiday Wreath With Paper
Before attaching paper decorations, crafting a sturdy base ensures your wreath holds its shape and displays neatly on any wall or door.
Step by Step Base Preparation
- Trace a large plate or bowl onto cardboard to make a circle around 12 inches wide.
- Draw a second inner circle about 7 to 8 inches wide.
- Cut out the outer circle first, then carefully remove the inner circle.
- Smooth rough edges with scissors for a tidy finish.
- Cover the base with green, red or neutral colored paper for a polished look.
Although cardboard works beautifully, switching to foam board creates a crisp foundation that resists bending and clings securely to adhesives.
Folding and Shaping Paper Pieces
Shaping paper leaves, petals or accents adds texture and dimension that transforms a simple flat wreath into a decorative showpiece that feels surprisingly dynamic.
Easy Folds for Maximum Dimension
- Fold leaves slightly lengthwise to create a gentle ridge down the center.
- Curl the edges outward using a pencil to give petals a soft shape.
- Create accordion folds for playful accents that children love making.
- Bend holly edges upward for a more traditional evergreen effect.
Tips for Clean, Tidy Folds
- Score heavy cardstock lightly with a ruler before folding.
- Press folds with the side of your thumb for smooth creases.
- Avoid over bending edges to prevent tearing.
- Use paper clips to hold complex folds while drying.
- Combine multiple fold types for richer dimension.
Assembling Your DIY Holiday Wreath With Paper
Assembling your wreath is the most exciting part, because the scattered pieces from your workspace begin forming a colorful circular display that feels festive, balanced and proudly handmade.
Step 1: Planning the Layout
Before gluing, laying pieces loosely around the base helps you preview spacing and color flow.
- Place leaves or petals in a circular pattern around the base.
- Overlap shapes slightly to hide visible gaps.
- Alternate between colors for an appealing rhythm.
- Create small clusters of three or four pieces for visual interest.
- Add decorative accents last after the main layer looks balanced.
Step 2: Gluing the Paper Shapes
Using tidy gluing techniques prevents messes and keeps the wreath looking clean and intentional.
- Apply a thin line of school glue along the base of each paper piece.
- Press gently for a few seconds until the bond holds.
- Work clockwise around the wreath to maintain consistent spacing.
- Add a second layer on top for texture if desired.
- Allow all glued pieces to dry fully before adding accents.
Step 3: Adding Decorative Highlights
- Glue small berries made from red paper circles.
- Add small stars or snowflakes for winter themes.
- Use bows or ribbons for extra charm.
- Include hand drawn textures for personalized touches.
- Try metallic accents for a modern twist.
Color Palette Ideas for Every Season
Choosing a color scheme sets the mood of your wreath and lets families match the decor to their holiday traditions or living room style.
Winter Holidays
- Classic red, green and gold.
- Frosty white, silver and pale blue.
- Warm cranberry, pine green and candlelight yellow.
Spring Celebrations
- Soft pink, lavender and mint green.
- Bright yellow, peach and sky blue.
- Garden green, pastel orange and lilac.
Autumn and Harvest
- Burnt orange, deep red and brown.
- Golden yellow, rust and moss green.
- Warm neutrals with pumpkin accents.
Summer Themes
- Coral, aqua and sunshine yellow.
- Patriotic red, white and blue for July celebrations.
- Tropical green, pink and turquoise.
Kid Friendly Variations for a Fun Paper Wreath DIY
Children love participating in crafts when the steps feel accessible and playful, so offering variations tailored to younger ages keeps everyone engaged and excited.
Ideas Kids Can Do Easily
- Use pre cut shapes to avoid tricky scissor work.
- Add sticker sheets for quick decoration.
- Create fingerprint ornaments with washable paint.
- Let kids choose color patterns freely.
- Glue pom poms or cotton balls for soft textures.
Kid Safe Crafting Tips
- Provide blunt tip scissors for young children.
- Use glue sticks instead of liquid glue when possible.
- Cover the table with craft paper to simplify cleanup.
- Let adults handle hot glue if used.
- Break tasks into small steps to avoid overwhelm.
Budget Crafting Tips for Your DIY Holiday Wreath With Paper
Families who enjoy seasonal decor without overspending often choose budget craft techniques that still produce beautiful, long lasting wreaths.
Ways to Save Money
- Use leftover gift wrap or scrapbook paper for decorative elements.
- Recycle cardboard from cereal boxes for the wreath base.
- Cut shapes from last year’s holiday cards.
- Use magazine pages for unique patterns.
- Swap paper scraps with friends for variety.
Making Your Wreath Even More Sustainable
- Select recycled or eco friendly paper whenever possible.
- Reuse wreath bases year after year with new paper layers.
- Store shapes from past seasons to repurpose creatively.
- Compost paper scraps if they do not contain glitter or plastic.
- Teach kids about sustainability through imaginative crafting.
How to Store Your Paper Wreath for Future Holidays
Storing your wreath properly allows your handmade seasonal decor to last many years, preserving the carefully crafted shapes and colors your family enjoyed creating.
Storage Tips for Paper Wreaths
- Place the wreath in a shallow box slightly larger than its diameter.
- Use tissue paper layers to prevent flattening.
- Store in a cool, dry space away from sunlight.
- Avoid stacking heavy items on top.
- Label the box so it’s easy to find each season.
Keeping Colors Bright Over Time
- Avoid direct sunlight exposure, which fades pigment.
- Choose acid free paper for longer lasting color.
- Spray lightly with a matte sealant (adult step only).
- Prevent moisture to avoid wrinkles or warping.
- Repair small bent shapes with gentle refolding.
Final Thoughts: Celebrate the Season With Your DIY Holiday Wreath With Paper
Completing this diy holiday wreath with paper brings families together in a warm, creative activity that not only produces a charming piece of seasonal decor but also builds traditions, encourages imagination and fills your home with handmade cheer that cannot be purchased at any store.
Whether your family prefers a simple paper wreath diy design or a highly decorated masterpiece bursting with colors, ribbons and layered paper shapes, the process remains joyful, budget friendly and accessible to all ages, making it an ideal project to revisit year after year.
As your crafting confidence grows, experimenting with new shapes, patterns, holiday themes and color palettes becomes even more exciting, turning each wreath into a reflection of the moment, the season and the creativity shared in your home.
Through gentle cutting, careful folding, thoughtful gluing and festive decorating, your handmade wreath becomes a celebration of togetherness and creativity, ready to brighten your holiday season with warmth, color and cheerful handmade beauty.