Beginning your crochet journey can feel both comforting and slightly overwhelming, especially when your hands are still getting used to holding yarn and hook together for the very first time, yet the process becomes deeply soothing once you understand the rhythm of each stitch and start watching your fabric grow one loop at a time.
Creating a classic granny square — a timeless project loved by beginners and experts alike — offers one of the gentlest paths into the world of crochet because the pattern builds gradually, encourages steady practice, and rewards every new crafter with a beautiful wearable or decorative piece that grows round after round.
This guide will walk you through crochet basics learn granny square from the slipknot all the way to the finished square, using long, calm explanations, detailed movement descriptions, and multiple step-by-step lists so that your hands and your mind feel supported during every moment of learning.
Instead of assuming you already know how to hold your yarn or identify stitch height, this tutorial breaks the process into slow, close-up instructions written with the perspective of someone who is touching yarn for the very first time, which makes it ideal for crochet for beginners who want clarity and comfort while practicing.
You will also find a complete stitch glossary, a small guide explaining yarn weight and hook sizes, plus detailed explanations of common beginner mistakes and gentle corrections that keep your confidence intact as you continue stitching your very first granny square.
Crochet Basics Learn Granny Square: Why the Granny Square Is Perfect for Beginners
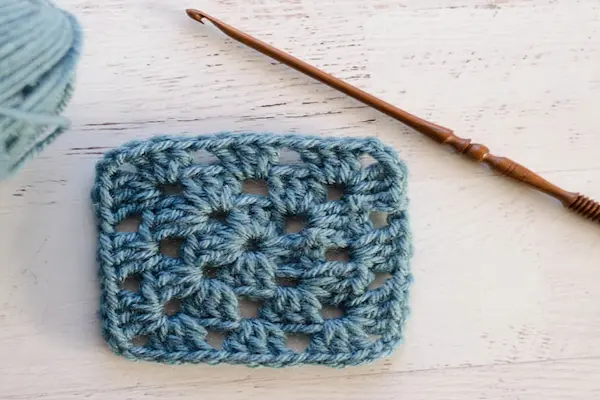
Learning crochet feels more natural when you start with a project that repeats itself predictably, and the granny square does exactly that, offering rounds made of similar stitch groups and a structure that becomes memorized quickly even by hands that tremble on their first attempts.
Because this pattern grows outward in a balanced shape, it teaches you how to maintain tension, how to recognize stitch tops, and how to control the movement of your hook through loops that sometimes feel slippery at first but soon begin behaving more cooperatively with each repetition.
Granny squares also provide instant gratification because you can complete one in a short session, and as soon as you finish your first, you can begin a second, then a third, gradually forming blankets, bags, pillows, coasters, or any other project you imagine from a set of small colorful squares.
Stitch Glossary for Crochet Beginners
Understanding basic stitches before starting your first granny square helps prevent confusion once the step tutorial begins, and having this glossary nearby gives you quick reference while practicing.
Slipknot
The slipknot forms the starting loop on your hook, allowing the yarn to tighten when pulled while staying adjustable enough for beginners to redo as many times as needed.
Chain (ch)
Chains create the foundation of many crochet patterns and act as the lifting stitch needed to begin rounds or rows; you pull a loop through another loop repeatedly without adding height.
Slip Stitch (sl st)
This very small and flat stitch joins rounds or moves your yarn without adding height to the fabric, making it essential for building circles like granny square centers.
Double Crochet (dc)
The stitch most commonly used in granny squares, double crochet creates height by wrapping yarn over the hook before pulling through loops in a sequence of steps that gradually build tall, airy fabric.
Magic Ring (optional alternative start)
The magic ring forms an adjustable loop that closes tightly once the first round of stitches is complete, though beginners may prefer a chain loop since it feels more stable and less confusing during early practice.
Yarn Weight and Hook Sizes: A Gentle Guide
Beginning crafters often feel overwhelmed by yarn labels because they display weight categories, hook suggestions, and fiber content, yet understanding these details makes your stitching experience smoother and more comfortable.
Yarn Weight Explained
Yarn weight refers to the thickness of the strand, not the mass of the ball, and choosing the right weight affects how easy it feels to see your stitches and guide your hook.
- Super Fine (Weight 1): very thin, not ideal for first projects.
- Fine (Weight 2): soft and light, but still delicate for beginners.
- Light (Weight 3): excellent for garments but slightly small for beginners.
- Medium (Weight 4): perfect starting choice because stitches remain visible.
- Bulky (Weight 5): thick, easy to see, but slightly harder to maneuver.
Hook Sizes
Hook size determines how large your loops will be and influences the flexibility of your fabric, so using an appropriate hook size makes your granny square feel comfortable to create.
- 4.0 mm to 4.5 mm: suitable for light yarns.
- 5.0 mm: ideal for medium weight yarns, great for beginners.
- 6.0 mm: good for bulky yarns with wide stitches.
Most beginners find that a 5.0 mm hook paired with a medium weight yarn provides a balance between visibility and control, making the first granny square much easier to work through slowly and confidently.
How to Hold Your Yarn and Hook Comfortably
Although every crocheter eventually develops their own natural grip, starting with a stable position helps you maintain even tension and prevents hand fatigue while you learn granny square motions.
Understanding Hook Grips
- Knife Grip: holding the hook like a kitchen knife gives firm control and helps beginners keep wrist movements minimal.
- Pencil Grip: holding the hook like a pencil offers lighter, delicate control, especially useful for slow, step-by-step crocheting.
Controlling Yarn Tension
Tension shapes your stitches and ensures consistent size, and wrapping the working yarn gently around your non dominant hand allows every stitch to feel similar in height and tightness.
- Guide yarn over your index finger lightly.
- Allow the yarn to slide smoothly without gripping too tightly.
- Let your hand relax between stitches to avoid stiffness.
Step Tutorial: Crochet Basics Learn Granny Square From Slipknot to Finish
This complete step tutorial explains every movement slowly so that beginners never feel lost, and each round builds upon the previous one using predictable stitch groups that strengthen your confidence as the square grows.
Step 1: Forming the Slipknot
- Create a loop by crossing the yarn tail over the working yarn.
- Insert your hook under the working yarn and pull up a loop.
- Gently tighten the knot by pulling the tail while sliding the loop onto your hook.
Once your slipknot sits neatly on the hook, you are ready to begin creating the foundation chain that will form the center of your first granny square.
Step 2: Creating the Center Loop
You may begin with a magic ring or, for simplicity, start with a small chain loop that feels stable and beginner friendly.
- Chain four stitches slowly.
- Insert your hook into the first chain you made.
- Make a slip stitch to close the circle.
This tiny loop acts as the anchor for all double crochet clusters that form round one.
Step 3: Round One of Your Granny Square
Round one establishes the corner structure and sets the rhythm for the entire pattern.
- Chain three to form your first double crochet.
- Work two double crochets into the center loop to complete the first cluster.
- Chain two to create your first corner.
- Make three double crochets into the center, forming the second cluster.
- Chain two once again.
- Repeat this sequence until you have four clusters separated by chain two spaces.
- Join with a slip stitch at the top of the starting chain.
Step 4: Round Two
Round two expands the square by working clusters into each chain space from the previous round.
- Slip stitch into the first corner space for proper alignment.
- Chain three to stand in as your first double crochet.
- Add two more double crochets to complete the cluster.
- Chain two for the new corner.
- Work three more double crochets into the same corner.
- Move to the next corner space and repeat the sequence.
- Continue until all corners contain two clusters separated by chain two.
- Join with a slip stitch to finish the round.
Step 5: Round Three and Beyond
Every new round follows a similar pattern, increasing the square evenly and creating a rhythmic flow that becomes soothing with repetition.
- Clusters go into corners.
- Single clusters go into side spaces as your square grows.
- Chain two only at corners and chain one on the sides.
End each round with a slip stitch and begin the next round by moving into the nearest corner using slip stitches if needed.
Common Mistakes and Gentle Corrections
Beginners often worry when stitches appear uneven or corners feel twisted, yet most issues come from simple tension adjustments or skipped chains and are easy to fix.
- Square curling or twisting: loosen your stitch tension or chain slightly more at corners.
- Gaps too large: tighten yarn control or check if extra chains were added unintentionally.
- Square growing unevenly: ensure every corner has two clusters with a chain space between them.
- Miscounted stitches: pause after each cluster and check your work before continuing.
Pattern Variations for Your First Granny Square
Once you master the basic form, you can explore different styles that modify the square’s appearance while using familiar steps.
Color Change Squares
- Switch colors at the end of rounds.
- Carry yarn lightly or cut between rounds for crisp edges.
Solid Granny Squares
- Use continuous double crochet instead of separated clusters.
- Chain fewer stitches to tighten the structure.
Textured Granny Squares
- Add puff stitches for a raised effect.
- Insert front post stitches to create decorative ridges.
Final Checklist Before Finishing Your Square
- Ensure each round ends with a slip stitch join.
- Verify that each corner has exactly two clusters separated by chain spaces.
- Check that side spaces use chain one consistently.
- Weave in yarn ends using a yarn needle once square reaches desired size.
- Block the square lightly for neat edges and even shape.