Creating a kanban board setup at home can transform the way you organize your personal life, because once your tasks, chores, craft ideas, responsibilities and ongoing projects become visible in front of you, your mind finally stops trying to remember every detail, allowing you to breathe more easily as the board takes over the role of holding information while you focus simply on doing, finishing and moving forward.
Many visual thinkers feel immediately relieved when they interact with a physical board, since the act of moving a task card from one column to the next becomes a tactile confirmation that real progress is happening, and that sense of movement not only boosts motivation but also removes the invisible pressure of multitasking, which often hides behind mental lists and fragmented notes scattered around the house.
This long, detailed guide will walk you step by step through building a personal kanban system at home, explaining how to design your board layout, how to define practical WIP (work in progress) limits, how to write clear sticky note task cards, how to maintain a daily and weekly review routine, how to prevent the most common beginner mistakes and how to adopt a digital alternative if you decide to blend physical and virtual productivity later on.
Written with an encouraging, visual, and descriptive tone, this guide embraces the needs of someone who processes information with their eyes and hands, especially a person juggling home responsibilities, craft projects, creative hobbies and everyday chores, who wants a simple and intuitive way to see the full task flow at a glance without losing clarity or structure.
Kanban Board Setup at Home: Why Personal Kanban Helps Visual Thinkers
Visual thinkers often benefit tremendously from the physicality of personal kanban because the system transforms invisible demands into tangible objects, ensuring that tasks stop living in your mind and begin living on your wall or board, where you can observe their status without anxiety or confusion.
Instead of jumping between notebooks, apps, reminders and scattered sticky notes, all tasks are collected in a single flow that shows what you plan to do, what you are doing now and what has already been completed, helping your brain focus on only a small number of tasks at once instead of juggling everything simultaneously.
People who enjoy crafts, DIY projects and home activities often discover that personal kanban gives structure to their creative process while still allowing the freedom to adapt quickly, since tasks can be rearranged, paused, combined or delayed simply by picking up a card and moving it to a new column with no emotional pressure or forced complexity.
Materials You Need for a Home Kanban Board
Building a kanban board setup at home does not require expensive tools or specialized supplies, since the strength of the method relies on clarity, visibility and consistent habits rather than complicated equipment.
Basic Materials
- A visible surface such as a wall, door, corkboard or whiteboard large enough to hold multiple columns.
- Sticky notes in several colors to categorize tasks, priorities or types of responsibilities.
- Thick markers in dark colors to ensure readability from a distance.
- Masking tape or washi tape to divide the board into clear, clean columns.
- Index cards for larger tasks, multi-step projects or recurring responsibilities.
Since the system thrives on flexibility, you may replace any of these materials with alternatives already available at home, as long as the final result remains easy to read, intuitive to use and uncomplicated to adjust as you learn the flow.
Designing the Structure of Your Home Kanban Board
Choosing the structure of your board is one of the most important steps, because the layout determines how clearly your brain will interpret task flow, and when the structure is simple, balanced and visual, your productivity increases naturally without forcing discipline or rigid rules.
Core Columns for a Personal Kanban
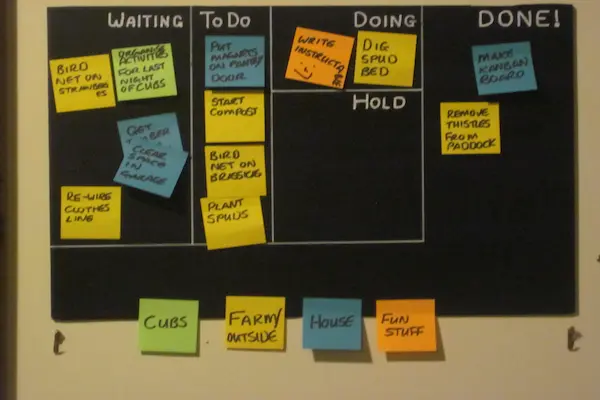
The classic personal kanban structure works beautifully in home environments, offering enough simplicity for daily use and enough depth for craft projects and chores.
- Backlog: a repository of all ideas, upcoming tasks, future chores, creative plans and responsibilities you might tackle later.
- To Do: a short, intentionally limited list of tasks chosen from the backlog that you plan to work on soon.
- In Progress: the active tasks currently receiving your attention, ideally kept small to prevent overload.
- Done: a rewarding column where finished tasks accumulate, helping you maintain motivation through visible progress.
Because the columns represent the entire task flow, your brain begins to understand work as movement, and each card becomes a journey from intention to completion, rather than a burden sitting on an endless to-do list.
Understanding Work-in-Progress Limits (WIP Limits)
WIP limits serve as the heart of the kanban method, as they prevent you from overloading yourself with more tasks than you can realistically handle at once, which helps reduce stress, increase focus and encourage steady, meaningful progress.
For a kanban board setup at home, WIP limits are especially valuable because household responsibilities and craft projects often require attention that varies from day to day, making it easy to unintentionally start too many tasks at once.
How to Determine Your WIP Limit
- Observe how many tasks you usually start without finishing, especially during busy days.
- Cut that number in half to create an initial limit that encourages conscious choices.
- Write this limit directly above your “In Progress” column using a bold marker.
- Review your limit every week to adjust it as your routine shifts or your confidence grows.
Respecting WIP limits helps you finish more tasks than you start, which builds long-term momentum and reduces the mental clutter caused by juggling multiple unfinished activities.
Writing Clear Sticky Notes and Task Cards
The clarity of your cards influences how smoothly your task flow feels, since sticky notes act as tiny instructions guiding your actions throughout the day, and well-written cards eliminate hesitation, confusion and rethinking.
Recommendations for Effective Card Design
- Use short titles: concise phrases help you recognize tasks instantly.
- Add brief sub-steps: one or two lines can clarify what needs to happen next.
- Color-code by category: assign specific colors to home chores, craft projects, errands or personal planning.
- Include time estimates: simple approximations help you choose tasks that match your available energy.
Examples of Clear Task Cards
- “Sort craft supplies – label fabric bins.”
- “Clean kitchen counters – gather cloths first.”
- “Plan weekly meals – list ingredients to restock.”
- “Finish crochet coaster – weave in final yarn tail.”
Step Tutorial: Complete Kanban Board Setup at Home
Setting up your board does not require technical knowledge, but following a calm, step-by-step process ensures clarity from the very beginning, especially for visual thinkers who appreciate predictable progression.
Building Your Board
- Choose a visible location in your home, ideally near a common area where you naturally pass throughout the day.
- Measure the space available and decide how wide each column should be to hold multiple cards comfortably.
- Use tape to create the four main columns, spacing them evenly and drawing clean, straight lines.
- Label each column clearly using bold, simple lettering.
- Create your first batch of cards, focusing only on tasks relevant for the next few days.
- Place all cards initially in the backlog to avoid confusion and premature organization.
- Select a small number of tasks to move to the “To Do” column, keeping the board clean and uncluttered.
- Transfer a single card to “In Progress” when you are ready to take action, respecting your WIP limit.
- Move cards to “Done” as soon as they are completed, ensuring every achievement becomes a visible part of your board.
Daily Review Routine
A kanban board stays functional only when reviewed consistently, since reviewing your board restores alignment between your intentions and your actual progress, preventing forgotten tasks or stalled cards.
Daily Review Checklist
- Check your “In Progress” column and confirm whether something can move to “Done.”
- Evaluate if any task in “To Do” deserves to be promoted to “In Progress.”
- Ensure your WIP limit has not been exceeded.
- Glance at the backlog quickly to identify upcoming priorities without overwhelming yourself.
Weekly Review Routine
While daily reviews keep your board flowing, weekly reviews help refine your entire system by analyzing patterns, recognizing bottlenecks and planning upcoming cycles with greater purpose and clarity.
Weekly Review Steps
- Look through the “Done” column and celebrate the tasks you completed, reinforcing motivation.
- Identify cards that stayed too long in “In Progress” and explore the reasons behind the delay.
- Reevaluate your backlog and remove or update tasks that no longer matter.
- Reorganize your “To Do” column for the upcoming week, selecting realistic goals.
- Review and adjust your WIP limit if you felt overwhelmed or under-challenged.
Common Mistakes When Using a Home Kanban Board
Many beginners run into similar issues when first experimenting with personal kanban, but these problems are easy to resolve once you understand the underlying habits that support a steady task flow.
- Overfilling the board: adding too many cards creates noise and reduces clarity.
- Ignoring WIP limits: starting too many tasks prevents completion and adds stress.
- Failing to review: skipping reviews leads to stagnant cards and disorganized columns.
- Writing vague cards: indistinct tasks require extra thinking and slow down progress.
- Mixing priorities without categories: combining unrelated tasks can confuse your flow.
Digital Options for Personal Kanban
Although this guide focuses on physical kanban board setup at home, some people appreciate the flexibility of blending physical and digital boards, especially when they need access to their tasks on the go or want automated reminders without abandoning the visual structure they enjoy.
Digital kanban tools follow the same principles as the physical system, offering columns, cards, color coding and drag-and-drop movement, which makes transitioning between both formats intuitive and natural.
Choosing to use a digital board does not replace your physical board; instead, it can complement the tactile experience by giving you a portable version of your task flow whenever needed.
Examples of How a Home Kanban Board Supports Daily Life
A kanban board setup at home adapts gracefully to different types of routines, helping visual thinkers manage both tiny tasks and big household or craft projects without losing track of intermediate steps.
Household Chores
- Weekly kitchen cleaning divided into prep, scrubbing and finishing tasks.
- Laundry workflow separated into wash, dry, fold and store.
- Seasonal deep-cleaning tasks organized across multiple weeks.
Creative and Craft Projects
- Knitting or crochet projects broken into pattern reading, material prep, stitching and finishing.
- Sewing tasks grouped into cutting, assembling, hemming and pressing.
- Painting or sculpting stages outlined clearly to avoid forgotten steps.
Personal Routines
- Reading lists organized by books started, books in progress and books completed.
- Meal planning separated into brainstorming, shopping and prepping.
- Self care habits visualized to encourage consistency.
Final Checklist for Your Kanban Board Setup at Home
Before fully committing to your new system, reviewing a final checklist helps ensure your board feels functional, intuitive and supportive of your real life needs rather than becoming another source of pressure.
- Verify that all column dividers are straight and clearly labeled.
- Ensure you have enough sticky notes in colors that make sense to you.
- Rewrite any task cards that feel unclear or need refinement.
- Confirm your WIP limit is visible and realistic for your energy level.
- Place the board in a location you naturally walk past multiple times a day.
- Decide when your daily review will occur to build routine consistency.
- Schedule a weekly review to realign your entire system.
- Prepare a space for completed cards to celebrate ongoing progress.