Learning how to make beeswax wraps is one of the most rewarding eco friendly projects a home cook can take on, especially when the goal is to replace disposable plastic wraps with reusable, durable, food safe and beautifully scented alternatives that elevate your kitchen routine while reducing everyday waste in a way that feels simple, achievable and deeply satisfying.
Many people interested in sustainability seek crafts that combine utility, household economy, and food safety, and that’s precisely why the DIY beeswax wrap process is gaining so many followers, as it requires accessible materials, very straightforward techniques, basic heating precautions, and a light understanding of wax proportions, allowing anyone to transform pieces of fabric into extremely durable, reusable solutions.
This comprehensive guide covers everything needed to complete the project with confidence, starting from fabric preparation and wax ratio calculations, moving through different melting methods such as the oven technique or the double boiler approach, and finishing with essential care, cleaning, storage, use cases and safety notes that ensure your wraps remain effective, hygienic and long lasting.
Why Learning How to Make Beeswax Wraps Is Worth It
Understanding how to make beeswax wraps allows you to shift away from disposable kitchen habits and adopt eco alternatives that feel more aligned with a sustainable home, because every wrap you produce replaces dozens of pieces of plastic film while adding a naturally antimicrobial layer of beeswax to your food storage routine.
Eco conscious home cooks appreciate the practicality of reusable wraps, as they mold gently around bowls, jars, sandwiches and fruit halves, sealing with the warmth of your hands while avoiding the crinkly frustration of single use plastics that never cling quite right and often tear at the worst moment.
Another reason this project appeals to beginners is that the materials are forgiving and the steps are easy to repeat, which means you can experiment safely with small batches, adjust the wax ratio over time and refine your technique in a cost effective way.
Because beeswax wraps diy methods do not rely on harsh chemicals, complicated tools or excessive temperatures, the process remains safe and enjoyable when performed with awareness, making it perfect for families who cook together, households striving for sustainable habits and cooks who prefer natural solutions in their kitchens.
Materials Needed for These Eco Alternatives to Plastic Wrap
Gathering your materials before you begin creates a smooth workflow and prevents interruptions once the wax melts, especially because beeswax cools quickly and works best when applied in one controlled session.
Basic Materials for Beeswax Wraps DIY
- 100% cotton fabric, thin and tightly woven for optimal absorption.
- Pure beeswax pellets or grated beeswax blocks.
- Pine resin (optional for extra cling) in powdered or chunk form.
- Jojoba oil or coconut oil for added pliability.
- Parchment paper or baking paper to protect surfaces.
- A baking sheet or flat heat safe tray.
- A brush or silicone spatula (optional depending on method).
Choosing high quality cotton ensures your wraps remain breathable, durable and free from synthetic fibers that resist wax absorption or release unwanted odors around sensitive foods.
Optional Tools for Improved Results
- Pinked edge scissors to reduce fabric fraying.
- Measuring spoons for consistent wax and oil ratios.
- A dedicated oven rack or cooling grid.
- A double boiler for melting wax safely on the stovetop.
- Gloves or heat resistant fingers for handling warm wraps.
Using optional tools adds polish but is not required, meaning this eco craft remains accessible even for beginners with minimal equipment.
Preparing Fabric Before Applying Beeswax
Proper fabric preparation ensures that wax adheres uniformly, producing wraps that are flexible, visually appealing and highly functional for food storage.
Selecting the Right Cotton
- Choose fabric that is 100% cotton, avoiding blends that resist wax penetration.
- Opt for tighter weaves, as loose weaves absorb too much wax and become stiff.
- Pick patterns and colors resistant to frequent washing.
- Use light to mid weight cotton for the best balance of structure and pliability.
Cutting the Fabric
- Wash and dry the fabric to remove sizing, chemicals and shrinkage factors.
- Iron the fabric flat to eliminate wrinkles that interfere with wax coverage.
- Cut squares or rectangles using sharp scissors or pinking shears.
- Select common sizes such as 8×8, 10×10 or 12×12 inches.
- Round the corners if desired to avoid wax buildup in sharp angles.
Understanding Wax Ratios in Beeswax Wraps DIY
Wax ratio determines how flexible, clingy and durable your wraps become, so taking a moment to understand the balance of beeswax, resin and oil helps you achieve consistent results.
Standard Wax Mixture Ratio
- Beeswax: the structural base that coats and protects the fabric.
- Pine resin: improves cling and tackiness.
- Jojoba oil: softens the mixture for pliability.
For a reliable starter ratio, try the following mixture:
- 1 tablespoon beeswax
- 1 teaspoon pine resin
- 1 teaspoon jojoba oil
Adjusting these amounts allows you to experiment with firmness or softness depending on your food storage needs.
Alternative Wax Blends
- Omit pine resin if you prefer a simpler, softer wrap with less cling.
- Increase beeswax slightly for a firmer, crisper wrap.
- Add more jojoba oil for extra flexibility during cold months.
- Use vegan alternatives such as candelilla wax for plant based households.
- Combine beeswax with damar resin for stronger adhesives.
Melting Methods for Making Reusable Beeswax Wraps
Different melting methods offer varying levels of control and convenience, so choosing the approach that suits your equipment and comfort level keeps your project safe and effective.
Method 1: Oven Melting Technique
The oven method is simple, tidy and ideal for beginners who want even wax distribution without handling extremely hot mixtures directly.
- Preheat your oven to a low temperature around 180–200°F (80–95°C).
- Place parchment paper on a baking sheet to protect surfaces.
- Lay the cotton fabric flat on the parchment.
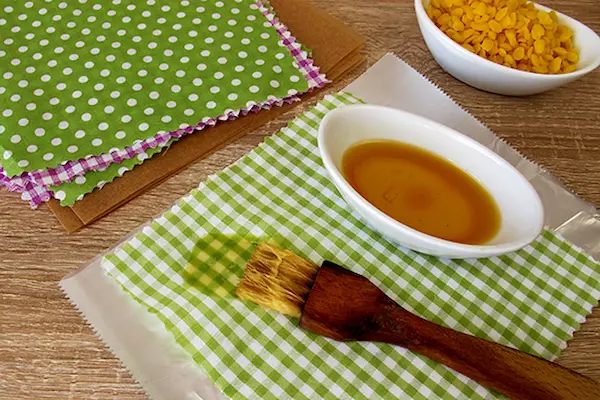
- Sprinkle beeswax pellets evenly or apply melted mixture using a brush.
- Warm in the oven until the wax melts completely.
- Remove carefully and lift the edges to allow excess wax to drip off.
Method 2: Double Boiler Technique
The double boiler technique offers excellent control, especially useful for mixing beeswax, resin and oil together before applying to fabric.
- Fill a small pot with an inch or two of water and bring to a simmer.
- Place a heat safe bowl over the pot without letting it touch the water.
- Add beeswax, pine resin and jojoba oil to the bowl.
- Stir gently as everything melts into a smooth mixture.
- Brush the melted solution onto your fabric on a lined baking sheet.
- Return the coated fabric to a warm oven briefly for leveling.
Method 3: Ironing Between Sheets
This method requires no oven but demands extra caution due to heat dispersion between paper layers.
- Place parchment above and below fabric.
- Sprinkle wax lightly across the fabric.
- Run a warm iron slowly until wax melts and spreads.
- Lift carefully to cool flat.
- Repeat for additional layers as needed.
How to Make Beeswax Wraps Step by Step
With materials ready and wax melted, assembling your wraps becomes straightforward once you follow a consistent workflow.
Step 1: Prepare Your Workspace
- Line your work surface with parchment or protective coverings.
- Place fabric pieces within easy reach.
- Arrange melted wax mixture nearby.
- Use heat resistant gloves or tools for safety.
- Keep children away from hot wax areas.
Step 2: Apply the Wax
Applying wax evenly ensures the final wrap functions properly for food storage.
- Distribute wax gently and uniformly across the fabric.
- Ensure edges receive enough coverage.
- Allow wax to level naturally in the oven.
- Avoid pooling, which leads to stiffness.
- Flip the wrap if needed for balanced absorption.
Step 3: Cool and Cure the Wrap
- Lift the wrap carefully by the corners.
- Hold for a few seconds to allow wax to solidify.
- Lay flat on a cooling rack once no longer dripping.
- Allow complete curing for several minutes.
- Test flexibility and reheat lightly if adjustment is needed.
Using Your Reusable Beeswax Wraps
Once your wraps are fully cured, they become versatile, reusable tools for an eco conscious kitchen, suitable for many types of foods and containers.
How to Shape Wraps Around Food
- Use the warmth of your hands to soften the wax naturally.
- Mold the wrap around bowls or jars by pressing along the rim.
- Fold around sandwiches or snacks for on the go storage.
- Wrap cut produce like apples, peppers or cheese.
- Avoid direct contact with raw meat or very greasy foods.
Best Use Cases for Beeswax Wraps
- Covering leftovers in small to medium bowls.
- Creating snack pouches for lunches.
- Wrapping homemade bread or baked goods.
- Protecting herbs or leafy greens in the fridge.
- Sealing jars without lids temporarily.
Cleaning and Caring for Beeswax Wraps
Proper cleaning extends the lifespan of your wraps, keeping them hygienic, reusable and pleasantly scented for months or even years.
Daily Cleaning Steps
- Wash wraps with cool water and mild soap.
- Avoid hot water, which melts wax.
- Use a soft cloth rather than abrasive sponges.
- Air dry fully before storing.
- Avoid wringing or twisting wraps.
Long Term Care Habits
- Refresh wraps in the oven if they become dull.
- Avoid storing near heat sources.
- Keep wraps in a cool drawer between uses.
- Repair thin spots with a light wax recoat.
- Replace wraps yearly depending on wear.
Safety Notes for Making and Using Beeswax Wraps
Safety is essential when learning how to make beeswax wraps, because handling melted wax, heated tools and food contact surfaces requires awareness and careful technique.
Safety While Melting Wax
- Never leave melting wax unattended.
- Use a double boiler to reduce overheating risks.
- Keep children and pets away from the workstation.
- Maintain low, controlled temperatures.
- Use heat resistant gloves when lifting trays.
Safety During Food Storage
- Do not use wraps with raw meat, poultry or fish.
- Avoid extremely greasy foods that degrade wax.
- Keep wraps out of microwaves and ovens.
- Discard wraps with cracks exposing fabric.
- Wash with cool water only to maintain food safety.
Final Thoughts: Enjoy the Practicality of Reusable Beeswax Wraps
Completing your first set of beeswax wraps diy gives you a sense of accomplishment that blends sustainability, practicality and confidence in your ability to produce durable, reusable food storage solutions that suit your eco conscious kitchen lifestyle beautifully.
Once you become comfortable with wax ratios, melting methods and fabric choices, making new wraps or refreshing old ones becomes an effortless ritual that keeps your kitchen stocked with reliable alternatives to plastic, all while supporting your environmental values.
Any time you need a fresh batch, simply gather your materials, warm your wax mixture and enjoy the process again, knowing your handmade wraps contribute to a cleaner home, a greener routine and a more mindful relationship with the food you prepare and store.