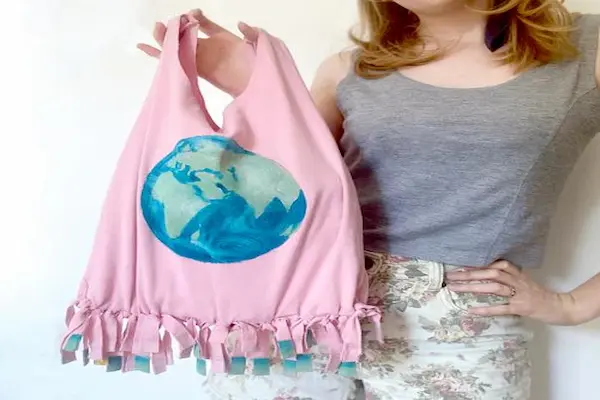
Turning old tees into sturdy tote bags is one of those projects that feels almost like a magic trick, especially when it does not require a single stitch.
Instead of letting worn, oversized or free event shirts collect dust at the back of your closet, you can transform them into colorful, eco friendly bags that carry groceries, books and craft supplies with ease.
For anyone who cares about upcycling but has limited tools, this simple no sew diy is the perfect mix of low effort, low cost and high satisfaction.
By the time you reach the end of this guide, you will know how to upcycle t shirts into tote bags using just scissors, a marker and your hands, plus a few clever knots.
You will also have a size guide to choose the right shirt, a clear cutting pattern, a step by step knot method, strength boosting tweaks and washing care tips that keep your new reusable bag in great shape.
Every step is broken down in a friendly way so that even complete beginners feel confident enough to grab a shirt and start cutting.
Why Upcycling T Shirts into a Tote Bag Is So Satisfying
Upcycling t shirts into tote bags taps into that delicious feeling of turning “something I never use” into “something I reach for every day”.
Instead of throwing away fabric that took water, energy and resources to produce, you extend its life in a practical and stylish way.
Each finished t shirt tote bag replaces single use plastic bags and even reduces the need to buy new reusable bags, which saves money while protecting the planet.
Crafters who have limited space and tools also benefit because this project requires almost nothing beyond a pair of reasonably sharp scissors and a flat surface.
Anyone who feels nervous about sewing machines or intimidated by long patterns can still enjoy the creativity of making, since this no sew diy relies on cutting and knotting rather than complicated techniques.
Every little stretch mark and faded print on a shirt turns into character once it becomes part of a soft, slouchy reusable bag with a story.
What You Need to Upcycle T Shirts into Tote Bags
Gathering materials before you begin makes the whole process smoother and prevents half finished projects from piling up around your home.
Fortunately, the supply list for this no sew diy is very short and friendly to eco conscious crafters and small budgets.
Basic Tools and Materials
A simple kit is all you need to turn an old shirt into a reliable t shirt tote bag.
- One clean cotton or cotton blend T shirt, preferably medium to heavy weight.
- A pair of sharp fabric scissors or the sharpest household scissors you own.
- A washable fabric marker, chalk or light pencil for marking cutting lines.
- A ruler or tape measure for following the size guide accurately.
- A flat surface such as a table, desk or cleared section of the floor.
Anyone who likes extra neat edges can also keep a small piece of cardboard nearby to slide inside the shirt while marking and cutting.
Nice to Have Extras for Customizing
Although not required, a few optional extras can give your upcycled reusable bag a little extra personality and functionality.
- Fabric scraps or old ribbon to tie around handles for a pop of color.
- Permanent fabric markers for adding small doodles, labels or eco themed slogans.
- Safety pins or clips to help hold layers together while you cut fringe and tie knots.
- Iron on patches from other worn clothes to cover stains or add decorative details.
These extras are entirely optional, so feel free to skip them if you are working with extremely limited tools or want the quickest possible t shirt tote bag.
Size Guide Before You Upcycle T Shirts into Tote Bags
Choosing the right size of shirt has a huge impact on how much your finished tote can carry and how comfortable it feels on your shoulder.
A clear size guide helps you match the shirt in your hand to the type of reusable bag you want to create.
How Shirt Size Affects Tote Capacity
Different shirt sizes naturally produce different tote shapes, so it helps to decide how you plan to use the bag before you start cutting.
- Small shirts create compact totes that suit quick errands, light snacks or a small craft project.
- Medium shirts give you a versatile everyday bag that holds a few books, a water bottle and a sweater.
- Large shirts or extra large shirts produce roomy grocery style totes ideal for market runs or bulky items.
- Longline or oversized shirts are perfect when you want a deep, slouchy bag that hugs your side.
Fabric weight is also important, because a very thin shirt might stretch too much under heavy loads, even if the size is generous.
Simple Measuring Steps for a Good Fit
Before you upcycle t shirts into tote bags, take a moment to measure and decide on the final dimensions you have in mind.
- Lay the shirt flat with the side seams aligned and smooth out any wrinkles gently.
- Measure across the chest from one side seam to the other to find the width of the future bag.
- Measure from the base of the neckline to the bottom hem to understand how tall the bag could be before trimming.
- Consider how much depth you want and remember that cutting off more fringe will make the bag shorter.
- Note these measurements on a scrap of paper so you can refer back to them while drawing your cutting pattern.
Once you have these numbers, it becomes easier to decide how deep to make the armhole cuts and how wide to draw the new handle opening at the neckline.
Drawing Your Cutting Pattern for a T Shirt Tote Bag
A clear cutting pattern turns the process from “random chopping” into “intentional crafting” and makes it easier to repeat the project successfully with other shirts.
The basic pattern for this no sew diy involves shaping the handles from the neckline and armholes, then creating a row of fringe along the bottom hem that will later become knots.
Planning the Shape of the Handles
Good handles make your t shirt tote bag comfortable to carry and strong enough to hold heavy items without digging into your shoulder.
- Fold the shirt in half vertically so that the side seams meet and the design, if any, stays centered.
- Use your ruler to mark how deep you want the handle scoop to be below the neckline, usually between ten and fifteen centimeters or four to six inches.
- Starting just inside one shoulder seam, draw a gentle curved line down toward your chosen depth and back up to the other shoulder, creating a wide U shape.
- Mark the existing armhole edges so you can cut slightly deeper if you prefer longer handles.
- Adjust the curve until it looks balanced and wide enough for your hand to reach inside the bag comfortably.
The folded shirt keeps both sides symmetrical, which makes your finished reusable bag feel more balanced when you carry it.
Marking the Bottom Fringe Area
The knotted fringe at the bottom of your t shirt tote bag is what replaces sewing and holds the weight of everything inside.
- With the shirt still lying flat and unfolded, measure a band along the bottom hem between seven and ten centimeters or about three to four inches tall.
- Draw a straight line across the shirt at the top of that band using your marker and ruler as a guide.
- Mark small vertical lines within that band every one to two centimeters or half an inch to indicate where you will cut individual fringe strips.
- Check that the marks run all the way across the front and back layers of the shirt for equal strips.
- Make sure the fringe band height is consistent so that your knots line up neatly when tied.
Taking a few extra minutes to mark fringe spacing will pay off later when the knots look tidy and the bottom edge hangs evenly.
Step by Step: No Sew DIY to Upcycle T Shirts into Tote Bags
Once your pattern is drawn, you are ready to dive into the most enjoyable part of this project, where an ordinary T shirt slowly transforms into a practical tote in your hands.
The steps below break down the entire no sew diy process from first cut to final knot, so you always know what is coming next.
Step 1: Cutting Off the Sleeves and Neckline
Shaping the top of the bag starts with removing elements that belong to a shirt and not to a tote.
- Lay the shirt flat again with the front side facing up and the bottom hem closest to you.
- Follow the curved line you drew around the neckline and cut through both layers carefully to create the future handle opening.
- Trim off the sleeves by cutting just inside the existing seams so you avoid thick, bulky edges.
- Smooth the newly cut edges with your fingers and gently round any corners that look too sharp or uneven.
- Try slipping your arm through the handle opening to see whether the depth feels comfortable and adjust if necessary.
Once this step is finished, the shirt already begins to resemble a bag, even though the bottom is still open.
Step 2: Cutting the Bottom Fringe
The fringe you cut now will later turn into knots that close the base of your t shirt tote bag and give it strength.
- Keep the shirt flat with the front and back sides perfectly aligned and the bottom hem toward you.
- Use your earlier vertical marks as guides and cut strips from the hem up to the line at the top of the fringe band.
- Make sure to cut through both layers at once so that each front strip has a matching back strip.
- Continue across the entire width of the shirt until all fringe strips are separated and easy to move.
- Shake the bottom gently to loosen any stuck threads and check that the strips are roughly similar in width.
Uneven fringe widths add a bit of handmade charm and will not ruin the structure as long as the strips are not extremely different in size.
Step 3: Tying the First Row of Knots
The first row of knots creates a rough seam along the bottom edge, closing the large opening in a fast, sewing free way.
- Take the first pair of fringe strips, one from the front and one from the back, and tie them together in a tight double knot.
- Repeat this process across the entire bottom edge until every pair of strips is tied once.
- Pull each knot firmly after tying to make sure it hugs the fabric without slipping.
- Work your way carefully, checking that no stray strips remain untied at the end.
- Inspect the line of knots and straighten them with your fingers to create a neat row.
At this point the bottom is technically closed, but a second row of staggered knots will make the base of your reusable bag much stronger.
Step 4: Adding a Second Layer of Knots for Strength
Creating a second staggered row of knots prevents gaps between the first knots and reinforces the bottom seam significantly.
- Locate the small space between the first and second knots along the row you just created.
- Take one strip from the first knot and one strip from the second knot and tie them together in another double knot.
- Move along the line, always pairing strips from neighboring knots rather than from the same pair.
- Continue across the entire width until every strip is part of a second knot and the gaps are mostly closed.
- Gently tug on the bottom of the bag to test the strength and adjust any knots that feel loose.
This simple staggered knot method creates a soft but reliable base that can carry groceries, books or yarn without fear of sudden openings.
Step 5: Shaping and Testing Your New T Shirt Tote Bag
After the knots are tied, your t shirt tote bag is technically finished, though a little shaping will help it look and feel nicer.
- Reach inside the handle opening and push the bottom knots inward so the bag puffs out into its natural tote shape.
- Check the length of the handles by placing the bag over your shoulder or holding it by hand.
- Trim any extremely long fringe pieces to create a more even decorative edge if you like.
- Load the bag with a few light items at first to test how it hangs and where the weight sits.
- Gradually add heavier items and observe whether the knots hold comfortably without stretching dramatically.
Once the bag passes your informal strength test, you officially have a functional no sew diy tote created entirely from an old shirt.
Knot Methods to Make Your T Shirt Tote Bag Stronger
The type of knot you use along the bottom seam influences how much weight your t shirt tote bag can carry safely.
Although a simple double knot works well for most everyday uses, other knots can give you extra strength when you plan to haul heavier items.
Different Knots You Can Use
Experimenting with knot styles is a fun way to customize your upcycling project and tailor each bag to its intended job.
- A standard double knot is quick and easy, making it perfect for first timers and light to medium loads.
- A square knot, also known as a reef knot, lies flatter and can be slightly more secure when tied snugly.
- A surgeon’s knot adds an extra twist before the final pull, which helps keep slippery fabrics from loosening.
- Triple knots may be helpful for very thin shirts, though they create more bulk at the bottom edge.
Whatever knot style you choose, consistency along the entire row is more important than perfection in any single knot.
Tips for Tight, Even Knots
A few simple habits will give you a cleaner, stronger knot line that makes your reusable bag more trustworthy.
- Always pull knots slowly and firmly rather than yanking, which can distort or tear delicate fabric.
- Use your fingertips to press each knot down toward the base of the fringe, keeping the line tight.
- Keep your strip widths relatively consistent so that one extremely narrow strip does not carry all the tension.
- Pause halfway across to lift the bag gently and see whether any knots start to loosen under weight.
- Retie any suspicious knots right away instead of hoping they will hold during real use.
By treating the knotting step as part of the crafting fun rather than a chore, you end up with a t shirt tote bag that you actually trust at the grocery store.
Strength Tips for Your Upcycled Reusable Bag
Even though this project does not involve sewing, a few clever decisions can dramatically increase the strength and durability of your finished tote.
These strength tips help you get more use out of every upcycled shirt and reduce the risk of surprise rips when the bag is full.
Choosing the Best Shirts for Heavy Duty Bags
Not every shirt will handle the same workload, so matching fabric type to purpose makes a big difference.
- Thicker cotton or jersey shirts from sports teams, events or quality brands handle groceries and books better.
- Stretchy fashion tees with very thin fabric are better suited for light items like scarves, yarn or gym clothes.
- Long sleeve shirts with sturdy fabric can produce tall totes that handle bulky but not extremely heavy objects.
- Heavily worn shirts with thinning areas around the seams may be best turned into smaller, lighter bags or cut for fringe embellishments.
When in doubt, tug gently on the fabric near the hem and neckline to feel how much resistance it offers before committing it to a hardworking reusable bag.
Structural Tricks to Add Extra Support
Small tweaks to your cutting pattern and knot placement can give your t shirt tote bag extra reinforcement.
- Leave a slightly deeper fringe band so that there is more fabric involved in each knot, creating a thicker bottom edge.
- Cut fringe strips a little wider when you expect to carry heavier items, because wider strips distribute tension better.
- Add a third row of staggered knots for extremely heavy duty bags, accepting a bit more bulk for much more security.
- Keep the handle scoop moderate instead of extremely deep so that the shoulder straps remain sturdier.
- Consider tying a few small knots near the handle bases to reinforce areas that will experience pulling.
These small structural decisions can turn an ordinary upcycled tote into a surprisingly strong everyday helper.
Washing and Care for a No Sew T Shirt Tote Bag
Once you upcycle t shirts into tote bags and start using them constantly, regular washing keeps them fresh and pleasant to carry.
Because the bottom seam is made of knots instead of stitching, a little extra attention during washing and drying helps maintain their shape.
Basic Washing Routine
A gentle approach is usually all it takes to keep your t shirt tote bag clean without stressing the fabric or knots.
- Shake the bag upside down outdoors or over a bin to remove crumbs, sand or tiny debris from the inside corners.
- Turn the bag inside out so any dirt from the interior surfaces gets more direct contact with soap and water.
- Machine wash on a cold, gentle cycle with similar colors or hand wash in a basin if you prefer more control.
- Use mild detergent and avoid harsh bleach, which can weaken fibers and fade prints.
- Hang or lay flat to air dry, gently reshaping the handles and bottom fringe while the fabric is still damp.
Once the bag is completely dry, you can flip it right side out and check that the knots remain tight and aligned.
Extra Care Tips for Longevity
Preventive care habits can easily double the lifespan of your upcycled reusable bag without much extra effort.
- Avoid overloading the bag with very sharp or extremely heavy objects that might strain a single area.
- Inspect the knot line every few weeks and retie any knots that seem to have loosened after repeated washing.
- Store the bag hanging or folded flat rather than crumpled at the bottom of another bag where it can stretch.
- Rotate between several t shirt tote bags so that no single one experiences constant heavy use.
With these easy care steps, even a no sew diy tote can become a long term companion instead of a short term experiment.
Creative Variations When You Upcycle T Shirts into Tote Bags
Once you master the basic cutting pattern and knot method, it becomes incredibly fun to experiment with variations that match your style and needs.
Every shirt in your drawer suddenly looks like a potential new t shirt tote bag with its own personality.
Different Styles from the Same Method
Small changes in the pattern create noticeably different looks while keeping the process simple and accessible.
- Cut a deeper scoop at the neckline to create longer handles for crossbody wear.
- Leave some fringe strips longer and untied at the sides purely as decoration while still closing the main seam with tighter knots.
- Turn a shirt inside out before cutting and knotting to hide printed designs for a more minimal tote.
- Use contrasting fabric strips from another old shirt to tie around the handles as soft grips.
These small styling tweaks keep the project interesting without requiring new tools or advanced skills.
Mixing Colors and Prints Through Upcycling
Upcycling multiple shirts lets you play with color combinations and patterns in your reusable bag collection.
- Choose a printed shirt for the main body of the tote and a solid colored shirt for additional knots or handle wrapping.
- Cut fringe from one shirt and tie it onto the bottom of another as decorative tassels along the seam.
- Create a set of bags using shirts from the same event, band or team for a coordinated look.
- Pick shirts in different shades of the same color family to make a subtle gradient across your collection of totes.
- Label each bag discreetly with fabric markers so you can remember which ones are best for groceries, books or crafts.
Upcycling in this playful way turns your everyday errand bags into little pieces of wearable art that also carry a clear eco friendly message.
Troubleshooting Common Problems in No Sew T Shirt Totes
Even with clear instructions, small issues may pop up when you try to upcycle t shirts into tote bags for the first time.
Knowing how to troubleshoot these common situations helps you rescue projects that might otherwise be abandoned.
Fixing Uneven Handles or Neck Openings
Sometimes the handle area ends up a bit lopsided, especially if you rush the cutting step.
- If one side feels longer, lay the bag flat, fold it in half and trim the longer section to match the shorter one.
- When the scoop looks too low, cut a straight line across the top to raise the neckline slightly.
- For handles that stretch too much, tie a small knot near each shoulder to shorten them and add reinforcement.
Minor imperfections often disappear once the bag is loaded and hanging, so avoid overcorrecting every tiny difference.
Dealing with Gaps Between Knots at the Bottom
Gaps between knots can appear when fringe strips are too far apart or when knots were tied loosely in the first round.
- Turn the bag inside out so that the knot line is more accessible and easier to see.
- Add another staggered row of knots by pairing neighboring strips again, focusing on the widest gaps.
- Tie extra loops around existing knots if a specific area feels weak or open.
- Test the bag with soft items and watch how the bottom behaves before trusting it with heavier loads.
- For very large holes, consider threading an additional strip of fabric through several knots and tying it off as a reinforcement band.
Most of these fixes take only a few minutes and can turn a flimsy base into a dependable seam.
What to Do If the Fabric Tears
Occasionally, a worn shirt might tear near the knots or handles, especially if the fabric was already fragile.
- If the tear is small and near the bottom, tie a new knot above it and trim away the damaged strip.
- For tears near the handle base, tie the affected area into a decorative knot cluster and adjust the handle shape.
- When the rip is large and compromises the structure, repurpose the bag into a smaller pouch or cut it down for other upcycling projects.
Embracing small flaws as part of the upcycling story keeps the process fun instead of frustrating.
Building a Whole Set of Upcycled Reusable Bags
After you make your first successful t shirt tote bag, it becomes surprisingly tempting to keep going until every forgotten shirt has a new role.
Creating a small fleet of bags lets you cover nearly every situation, from grocery trips and beach days to park picnics and craft storage.
Organizing Your New Collection
A bit of planning ensures that each bag has a specific purpose and gets used regularly rather than piling up again.
- Sort finished bags into categories such as groceries, books, gym, crafts and trips.
- Store grocery friendly totes near your front door or in your car so you remember them on shopping days.
- Keep a lighter, smaller bag rolled up inside your everyday backpack or handbag for surprise purchases.
- Assign one bag as a permanent project tote for your current knitting, crochet or drawing supplies.
- Rotate your favorites weekly so every bag gets a chance to shine and wear evenly.
This kind of intentional organization makes upcycling feel even more rewarding because you see the results in daily use.
Sharing and Gifting Upcycled T Shirt Totes
Homemade bags make charming eco conscious gifts that carry both practical value and a personal touch.
- Transform a sentimental band or event shirt into a tote for a friend who shares that memory.
- Bundle a set of t shirt tote bags together as a housewarming gift for someone who loves sustainable living.
- Offer to upcycle shirts for family members who have special tees they no longer wear but cannot throw away.
- Create a small stash of extra bags to donate to community groups or neighbors who might appreciate reusable options.
Every gifted bag spreads the message that upcycling can be fun, stylish and incredibly accessible, even with very limited tools.
Next Steps: Confidently Upcycle T Shirts into Tote Bags
By now, you have walked through the entire journey of turning old tees into functional, attractive totes without touching a sewing machine.
You have learned how to choose the best shirts using a size guide, how to draw a simple cutting pattern, how to tie strong knots, how to boost strength and how to wash and care for your new reusable bags.
With these skills, any time you find a stretched out shirt or a free event tee that does not fit your style, you immediately see a potential t shirt tote bag instead of future trash.
Eco friendly crafting becomes easier when projects are this forgiving, thrifty and adaptable to the tools you already own.
The next step is simple and exciting, because all it asks you to do is pick one shirt, clear a little space and follow the steps you have just learned.
After the first successful bag, confidence will grow quickly, and soon you may find yourself upcycling t shirts into tote bags for friends, family and every errand in your week.
Each time you carry your handmade tote out into the world, you are not only saving fabric from landfill, you are also quietly proving that creativity, care for the planet and a pair of scissors can go a very long way together.